
ApiCatcher Real-time Sync Guide
Push HTTP/HTTPS traffic captured on your phone to a computer or another system in real time.
Protocol spec: Real-time Sync Protocol
1. What it does
After ApiCatcher captures traffic over VPN on iOS or Android, it streams the data to a receiver on the LAN over WebSocket. Streaming starts as soon as capture starts. You do not wait for the session to end and then export a file.
| Receiver | Use | How to connect |
|---|---|---|
| ApiCatcher Desktop | Inspect, analyze, and replay traffic on a computer | Scan the Desktop QR code |
| Burp Suite extension | Security testing in Burp | Scan the QR code on the extension page |
| Custom receiver | Your own service or internal system | Enter a ws:// URL and test the connection |
Only one receiver can be enabled at a time. Turning one on turns the others off.
2. What you can do
Inspect traffic on a computer. Large JSON documents, long headers, and binary bodies are hard to read on a phone. After you connect to Desktop, you can parse, compare, and replay traffic on a larger screen.
Send traffic to Burp Suite. Install ApiCatcher for Burp Suite Extension. Traffic captured on the phone can go to Site map or Proxy History, then to Repeater or Intruder. The phone captures over VPN; the computer does not need a system proxy.
Feed an API security or DLP platform. Testers turn on capture and real-time sync. Traffic goes to your own detection platform, which scans national ID numbers, phone numbers, tokens, and secrets, identifies APIs that may leak data, and sends a report to developers or testers.
Update API docs from live traffic. The receiver compares fields against historical data, flags potentially new request or response fields, and can use a large language model to draft descriptions and annotations before emailing the documentation owner.
Automation or mocks. Store complete requests as fixtures, or generate mocks from them.
3. Before you start
- To decrypt HTTPS, install the ApiCatcher root certificate and trust it fully.
- Put the phone and the receiver on the same Wi-Fi. For data security, only LAN
ws://is supported.wss://is not supported. Traffic stays on the LAN. - Allow the receiver port through the firewall on the computer or server (for example
8080). - Start the receiver first, then test connectivity in the app.
4. Turn on real-time sync
- Open ApiCatcher and go to the capture home screen.
- Tap + in the top right.
- Choose Real-time Sync.
- Use the tabs: Desktop / Burp Suite / Custom Receiver.
When it is enabled, the home screen shows Real-time Sync Active and the receiver status, either Online or Offline. Tap the banner to return to settings.
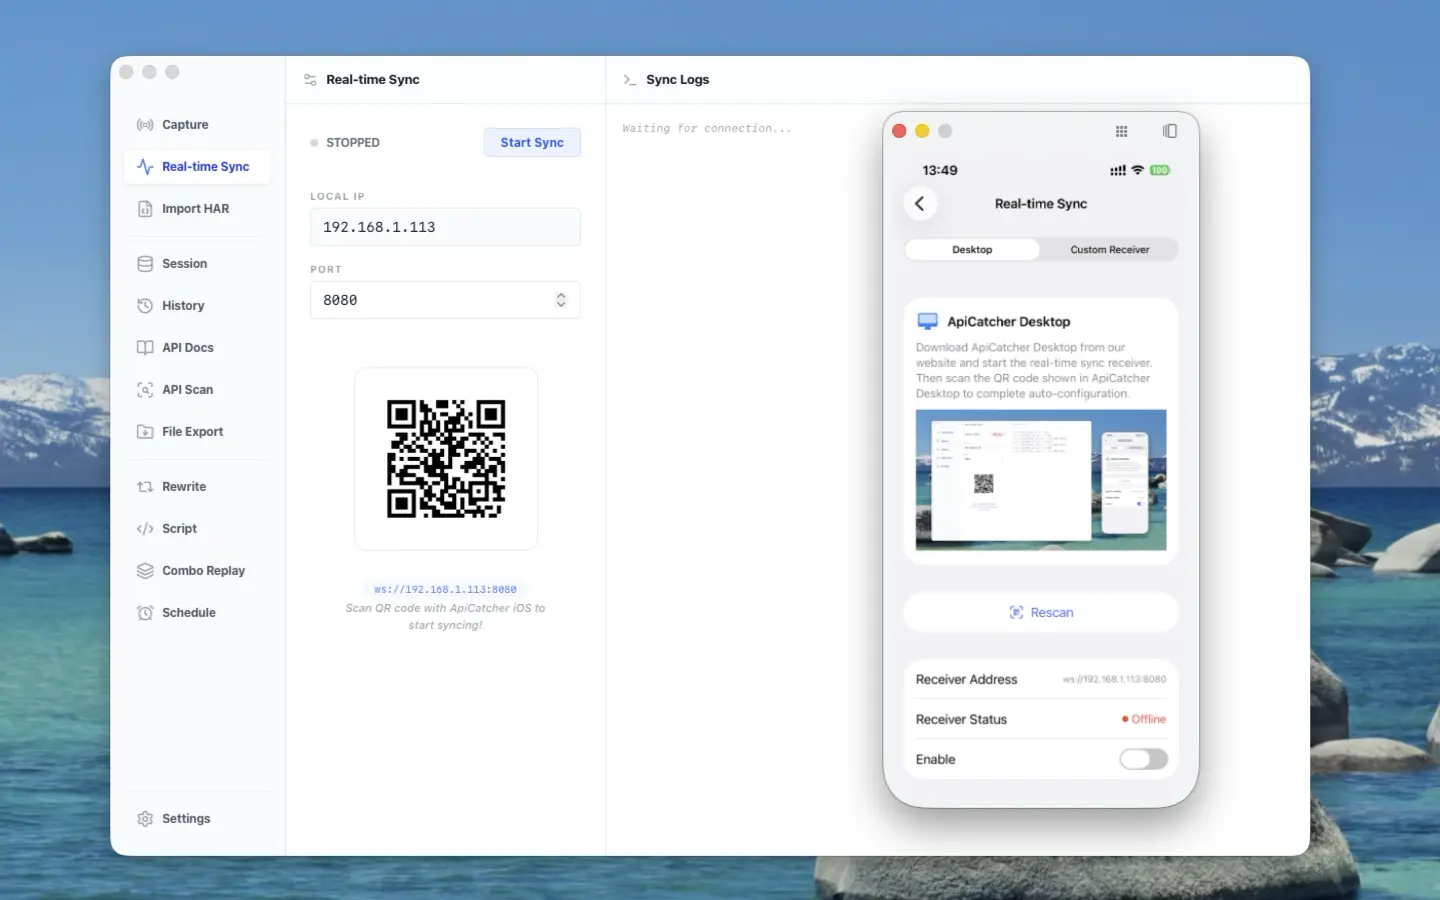
5. Connect ApiCatcher Desktop
- Download and open ApiCatcher Desktop from apicatcher.net.
- Start the real-time sync receiver in Desktop. A QR code appears.
- On the phone, open Real-time Sync → Desktop.
- Tap Scan QR Code and scan the code on Desktop.
- After a successful scan, you will see the receiver URL and Online status.
- Turn Enable on.
- Go back home, start VPN capture, use the target app. Requests should appear on Desktop.
If it shows Offline, check that Desktop is still running and that the phone and computer are on the same subnet, then tap Rescan.
6. Connect Burp Suite
Extension guide: ApiCatcher for Burp Suite Extension
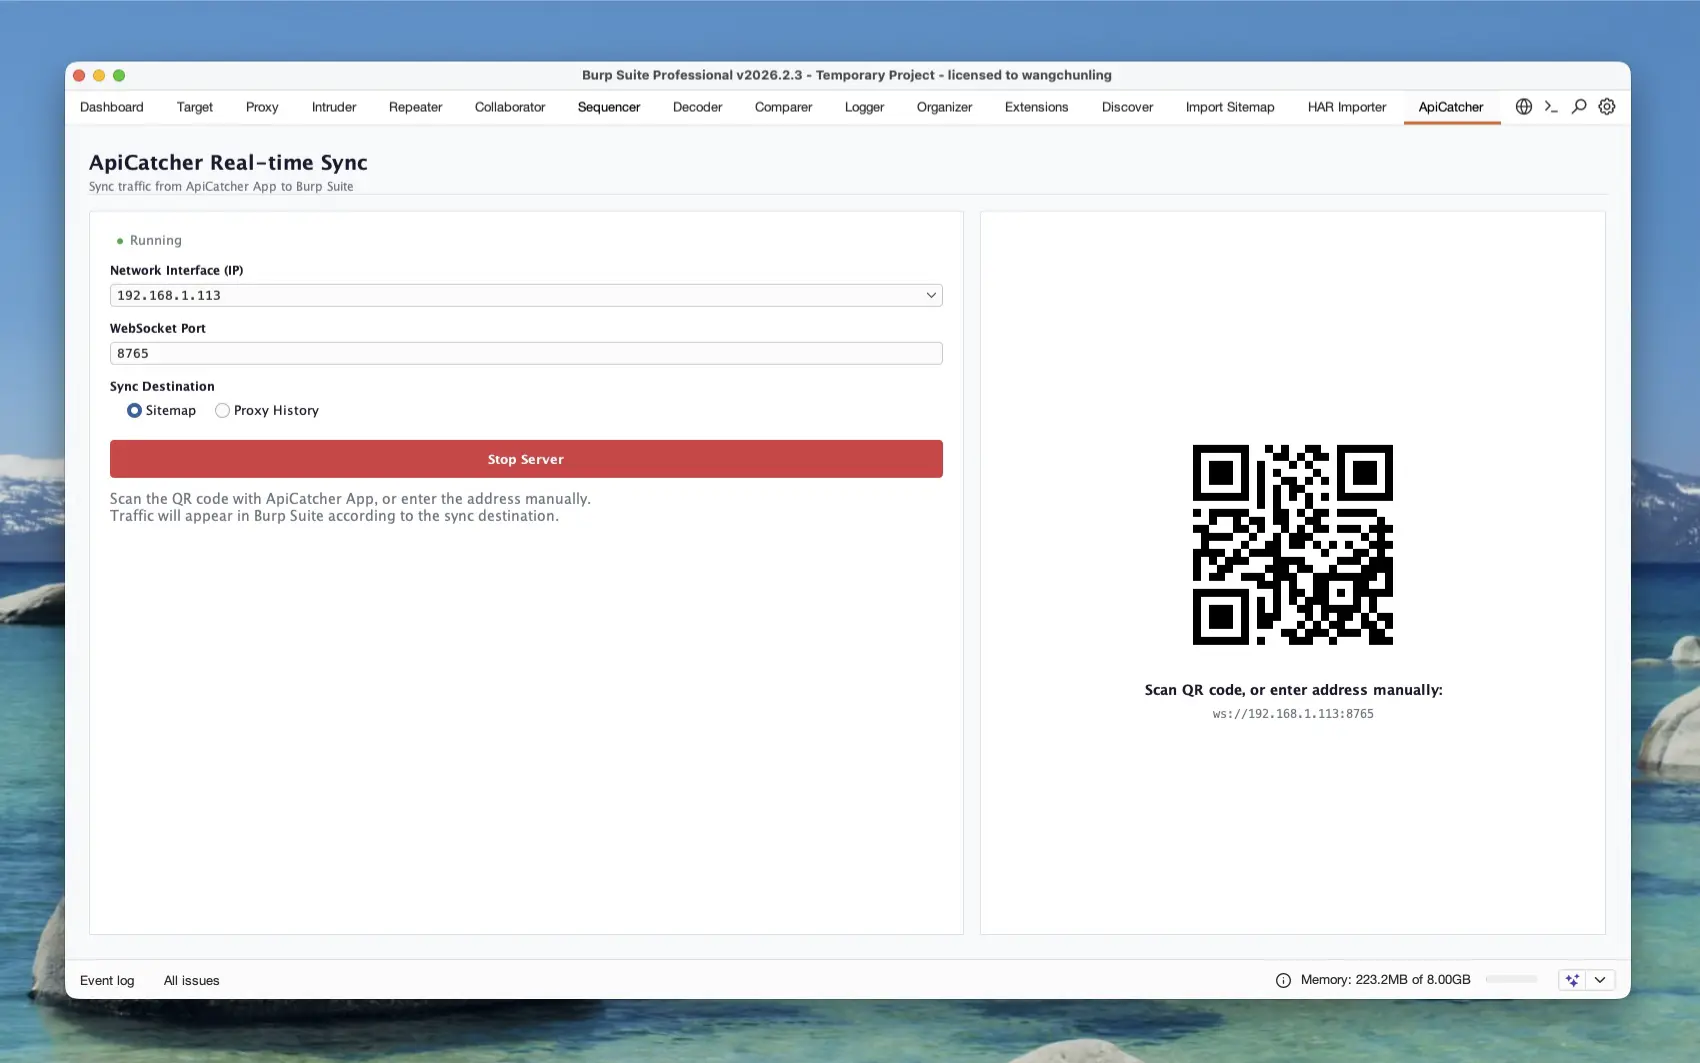
- Download the
.jar(or build it), then add it in Burp under Extensions → Installed → Add as a Java extension. - Open the ApiCatcher tab at the top. Make sure the WebSocket server is running; if not, click Start Server.
- On the phone, open Real-time Sync → Burp Suite and scan the QR code on the extension page.
- Turn on Enable, then start capture.
- Traffic goes to Target → Site map by default. For full request/response, switch the sync target to Proxy → HTTP history. History entries include
X-ApiCatcher-RequestId. - From there you can send requests to Repeater or Intruder.
If sync fails, open Extensions → Installed, select the extension, and check Output / Errors.
7. Connect a custom receiver
- Start the receiver on a computer or server on your internal network first (see section 8). The address looks like
ws://192.168.1.75:8080. - On the phone, open Real-time Sync → Custom Receiver.
- Enter
ws://IP:portin Remote URL. The Documentation link next to the field opens the protocol spec. - Tap Test Connection. The URL is saved when the test succeeds.
- Turn on Enable Real-time Streaming. It cannot be enabled if Remote URL is empty or the connection test fails.
- Changing the URL turns the switch off. Test again before turning it back on.
- Start capture. The receiver should start getting JSON frames.
Do not use http:// or wss://. Do not use 127.0.0.1 — that is the phone itself.
8. Implementing the protocol on a custom receiver
Spec: README.md
Repo: apicatcher-realtime-sync-protocol
Java SDK: apicatcher-sync-sdk-java
8.1 Connection
| Role | Who |
|---|---|
| WebSocket Client | ApiCatcher app |
| WebSocket Server | Your receiver |
- Use LAN
ws://(for data security,wss://is not supported; traffic stays on the LAN) - The app reconnects on its own after a drop
- Data captured while disconnected, along with partially transmitted chunks, is discarded and not retransmitted
- Frames from multiple requests may be interleaved over one connection; group them by
requestId
8.2 Message format
Each message is a JSON text frame:
{
  "type": "http",
  "requestId": "550e8400-e29b-41d4-a716-446655440000",
  "event": "req_start",
  "timestamp": 1711268370123,
  "payload": {}
}
| Field | Meaning |
|---|---|
type | Currently http |
requestId | UUID for one request; chunks are grouped by this |
event | See the events below |
timestamp | Unix timestamp in milliseconds |
payload | Event data |
8.3 Events
A typical request:
req_start → req_body* → res_start → res_body* → req_end
req_body / res_body may not occur or may occur multiple times. If there is no body, no corresponding body events are sent.
req_start — request sent:
{
  "type": "http",
  "requestId": "550e8400-e29b-41d4-a716-446655440000",
  "event": "req_start",
  "timestamp": 1711268370123,
  "payload": {
    "url": "https://api.example.com/data",
    "method": "POST",
    "httpVersion": "HTTP/1.1",
    "headers": [{"name": "User-Agent", "value": "ApiCatcher/1.0"}]
  }
}
Create a cache entry for this requestId and store URL, method, and request headers.
req_body / res_body — body chunks:
{
  "type": "http",
  "requestId": "550e8400-e29b-41d4-a716-446655440000",
  "event": "res_body",
  "timestamp": 1711268370123,
  "payload": {
    "data": "eyBzdWNjZXNz..."
  }
}
payload.data contains Base64-encoded binary data. Frames are sent in order. WebSocket runs over TCP, so arrival order matches send order. Decode and append the chunks in arrival order. Large bodies are split into chunks of about 16–32 KB. Do not buffer the entire body before processing it.
res_start — response headers arrived:
{
  "type": "http",
  "requestId": "550e8400-e29b-41d4-a716-446655440000",
  "event": "res_start",
  "timestamp": 1711268370123,
  "payload": {
    "status": 200,
    "httpVersion": "HTTP/1.1",
    "headers": [{"name": "Content-Type", "value": "application/json"}]
  }
}
req_end — this request is finished:
{
  "type": "http",
  "requestId": "550e8400-e29b-41d4-a716-446655440000",
  "event": "req_end",
  "timestamp": 1711268370123,
  "payload": {
    "error": null,
    "timings": {
      "send": 0,
      "wait": 150,
      "receive": 5
    }
  }
}
errorisnullon success, otherwise a string such as"Timeout"or"Connection Aborted"timingsare milliseconds: send, wait for response, receive- After
req_end, assemble the full record and drop the cache entry - On WebSocket disconnect, drop every record that has not received
req_end
8.4 Assembly
On connect
  └─ map: requestId → in-progress request

On JSON frame
  ├─ req_start  → create; store url / method / headers
  ├─ req_body   → Base64-decode, append to request body
  ├─ res_start  → store status / response headers
  ├─ res_body   → Base64-decode, append to response body
  └─ req_end    → store error / timings, hand off to your code, delete from map

On disconnect
  └─ clear the map; do not treat incomplete records as finished
Scan, store, or update docs only after req_end. The body is incomplete during chunking.
8.5 Java SDK
apicatcher-sync-sdk-java runs the WebSocket server and assembles chunks. When a request is complete, it invokes your callback with a single HAR 1.2 entry encoded as JSON (not a complete HAR file).
Requires JDK 11+ and Maven 3.x+.
Listener:
import com.apicatcher.sync.TrafficListener;

public class StandardConsoleListener implements TrafficListener {
    @Override
    public void onTrafficReceived(String harJson) {
        System.out.println("Received a complete request:");
        System.out.println(harJson);
    }
}
Start:
import com.apicatcher.sync.ApiCatcherReceiver;

public class App {
    public static void main(String[] args) {
        int port = 8080;
        ApiCatcherReceiver receiver =
            new ApiCatcherReceiver(port, new StandardConsoleListener());
        receiver.start();
        System.out.println("Listening on port " + port);
    }
}
On the phone, use ws://<this computer's LAN IP>:8080. Allow the port through the firewall.
In onTrafficReceived, you can scan for sensitive fields, compare traffic against documentation, send it to an analysis service, or write it to a message queue.
8.6 If you parse frames yourself
- Handle text frames only; group by
requestId - Append body chunks in arrival order; do not reorder by
timestamp - Concurrent requests interleave; isolate them by
requestId - On disconnect, drop unfinished records. The protocol does not retransmit
- The spec is
1.0.0-Draft. Ignore unknowneventvalues; do not exit
9. Common workflows
Capture for security scanning
- Start the intranet receiver
- Scan a QR code or enter
ws://, test, then enable - Start capture and exercise the target app according to the test cases
- The platform scans complete requests for sensitive fields
- Send a report by email or IM with URL, field, and whether it was in headers / query / body
Update docs from traffic
- The receiver keeps recent request/response samples per API
- Compare fields by path + method
- Send new or type-changed fields to a large language model to generate annotations
- Email an update list to the API owner
Security testing in Burp
- Install the extension and Start Server
- Scan the QR code in the app and enable Burp sync
- After capture, inspect APIs in Site map and select requests in History for further testing
10. FAQ
Connection test failed
Is the receiver running? Is the IP address the LAN address of this computer? Is the port open? Are both devices on the same subnet? Do not use 127.0.0.1 or http://.
Enable Real-time Streaming cannot be enabled
Remote URL cannot be empty. A custom receiver must pass Test Connection first.
Home shows offline but the receiver is running
Sleep, Wi-Fi changes, or a stopped receiver process will change the status to Offline. Check the status in settings. For Desktop / Burp, tap Rescan.
Some requests never appear on the computer
Traffic captured while disconnected is not resent. Make sure real-time sync is enabled before you start capture. Filters and domain blocklists may also cause some traffic to bypass MITM interception.
Can I enable all three receivers?
No. Priority is Desktop → Burp Suite → custom receiver. Only one receiver is connected at a time.
Why not send one HAR file?
A large body packed into one JSON object can run the VPN process out of memory. The protocol sends chunks. The Java SDK reassembles a HAR entry on the receiver.
The home status keeps spinning
The app is checking the WebSocket connection. If the check never finishes, check the network and the receiver process.
11. Links
- Protocol spec: https://github.com/apicatcher/apicatcher-realtime-sync-protocol/blob/main/README.md
- Protocol repo: https://github.com/apicatcher/apicatcher-realtime-sync-protocol
- Java receiver SDK: https://github.com/apicatcher/apicatcher-sync-sdk-java
- Burp Suite extension: https://apicatcher.net/en/burpsuite-extension
- Website: https://apicatcher.net