
Combo Replay User Guide
Document version: 20260729
App versions supported by this document:
- iOS: >= 3.13
- Android: >= 1.2.0
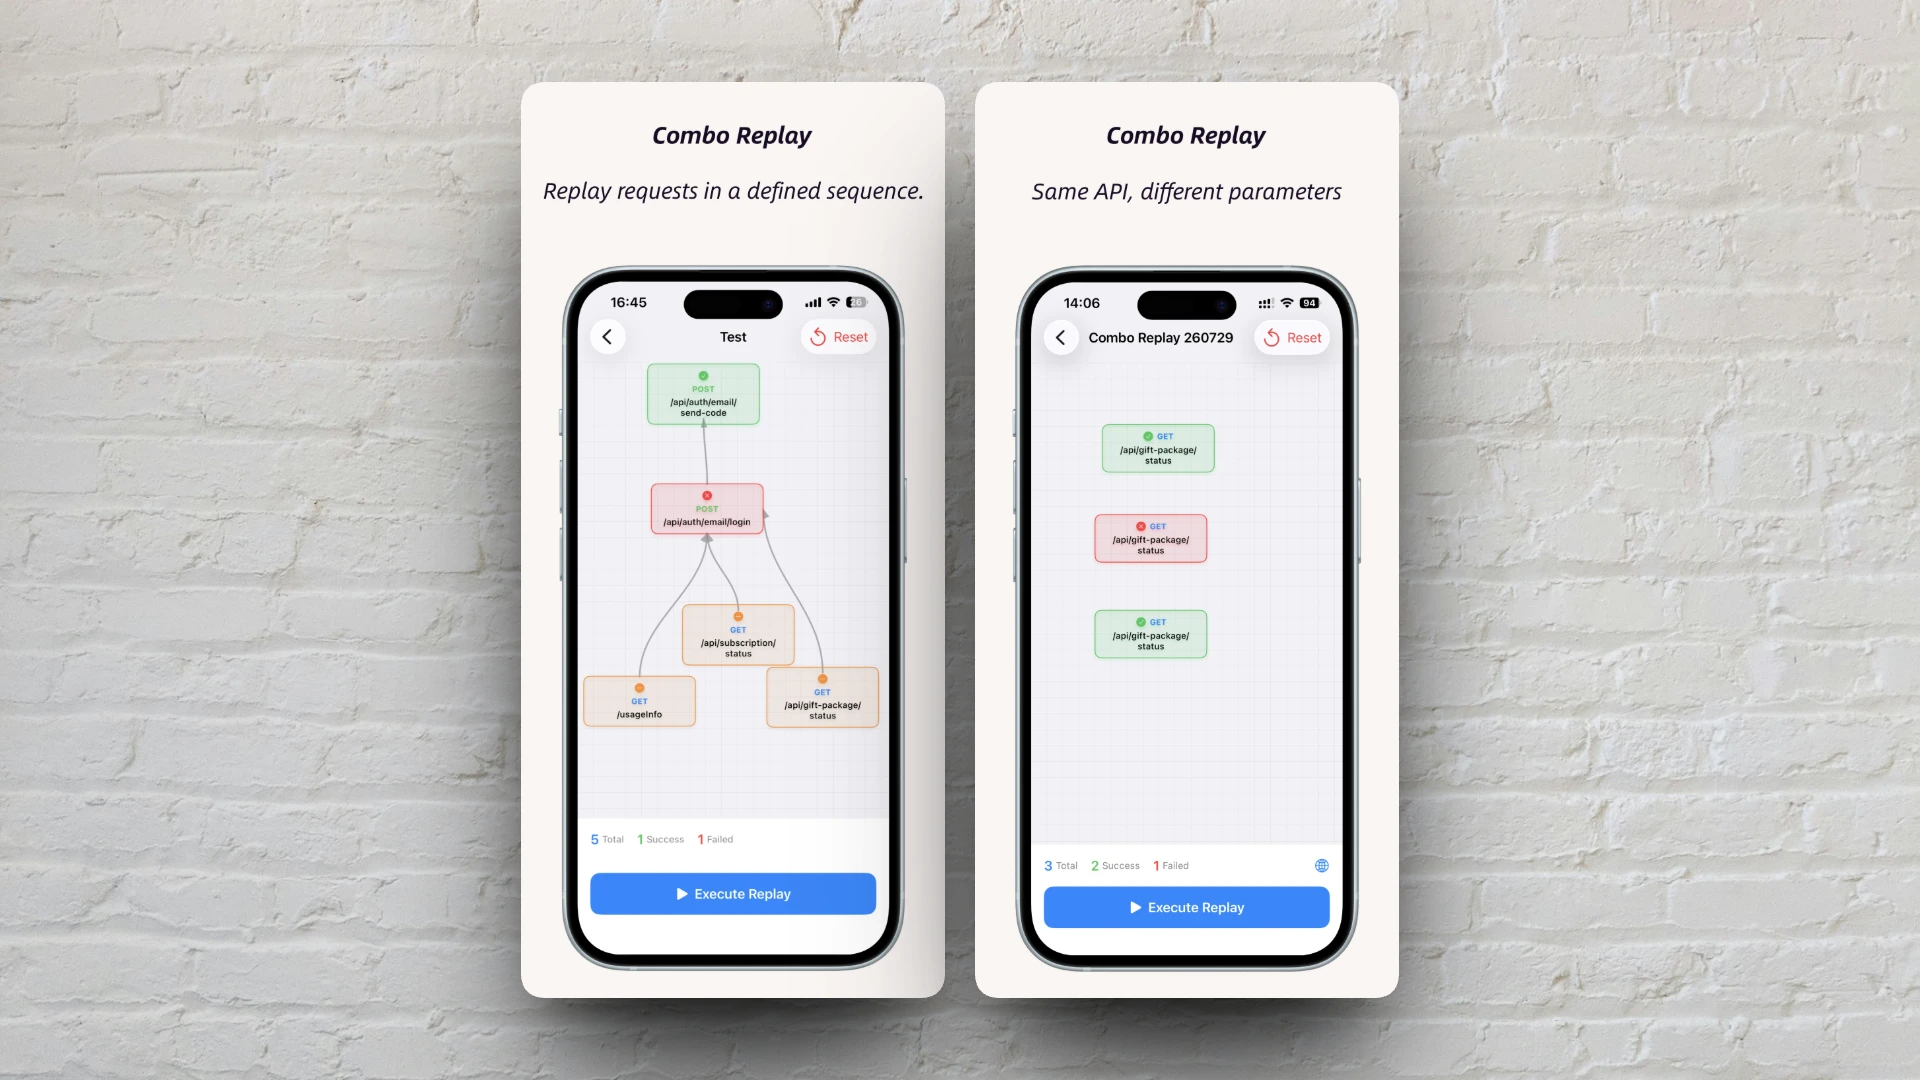
Combo Replay lets you orchestrate multiple HTTP/HTTPS requests into a single workflow, executing them serially or in parallel based on dependencies. It is ideal for API integration testing, regression testing, and batch validation of the same API with different inputs.
1. Feature Overview
| Capability | Description |
|---|---|
| Multi-request orchestration | Select requests from capture history and compose them on a canvas |
| Same API, multiple nodes | Add the same endpoint multiple times, each with its own preset parameters |
| Dependencies | Control execution order (e.g., login before business APIs) |
| Dependency injection | Automatically pass upstream values such as tokens into downstream requests |
| Expression injection | Generate timestamps and UUIDs dynamically, or use global variables |
| Manual execution | One-click replay with per-node request/response details |
| Scheduled tasks | Run automatically on Cron or custom intervals. See Scheduled Tasks |
2. Quick Start
Step 1: Capture traffic first
Combo Replay requests come from capture history. Capture a batch of HTTP/HTTPS requests in the app first (WebSocket requests cannot be added).
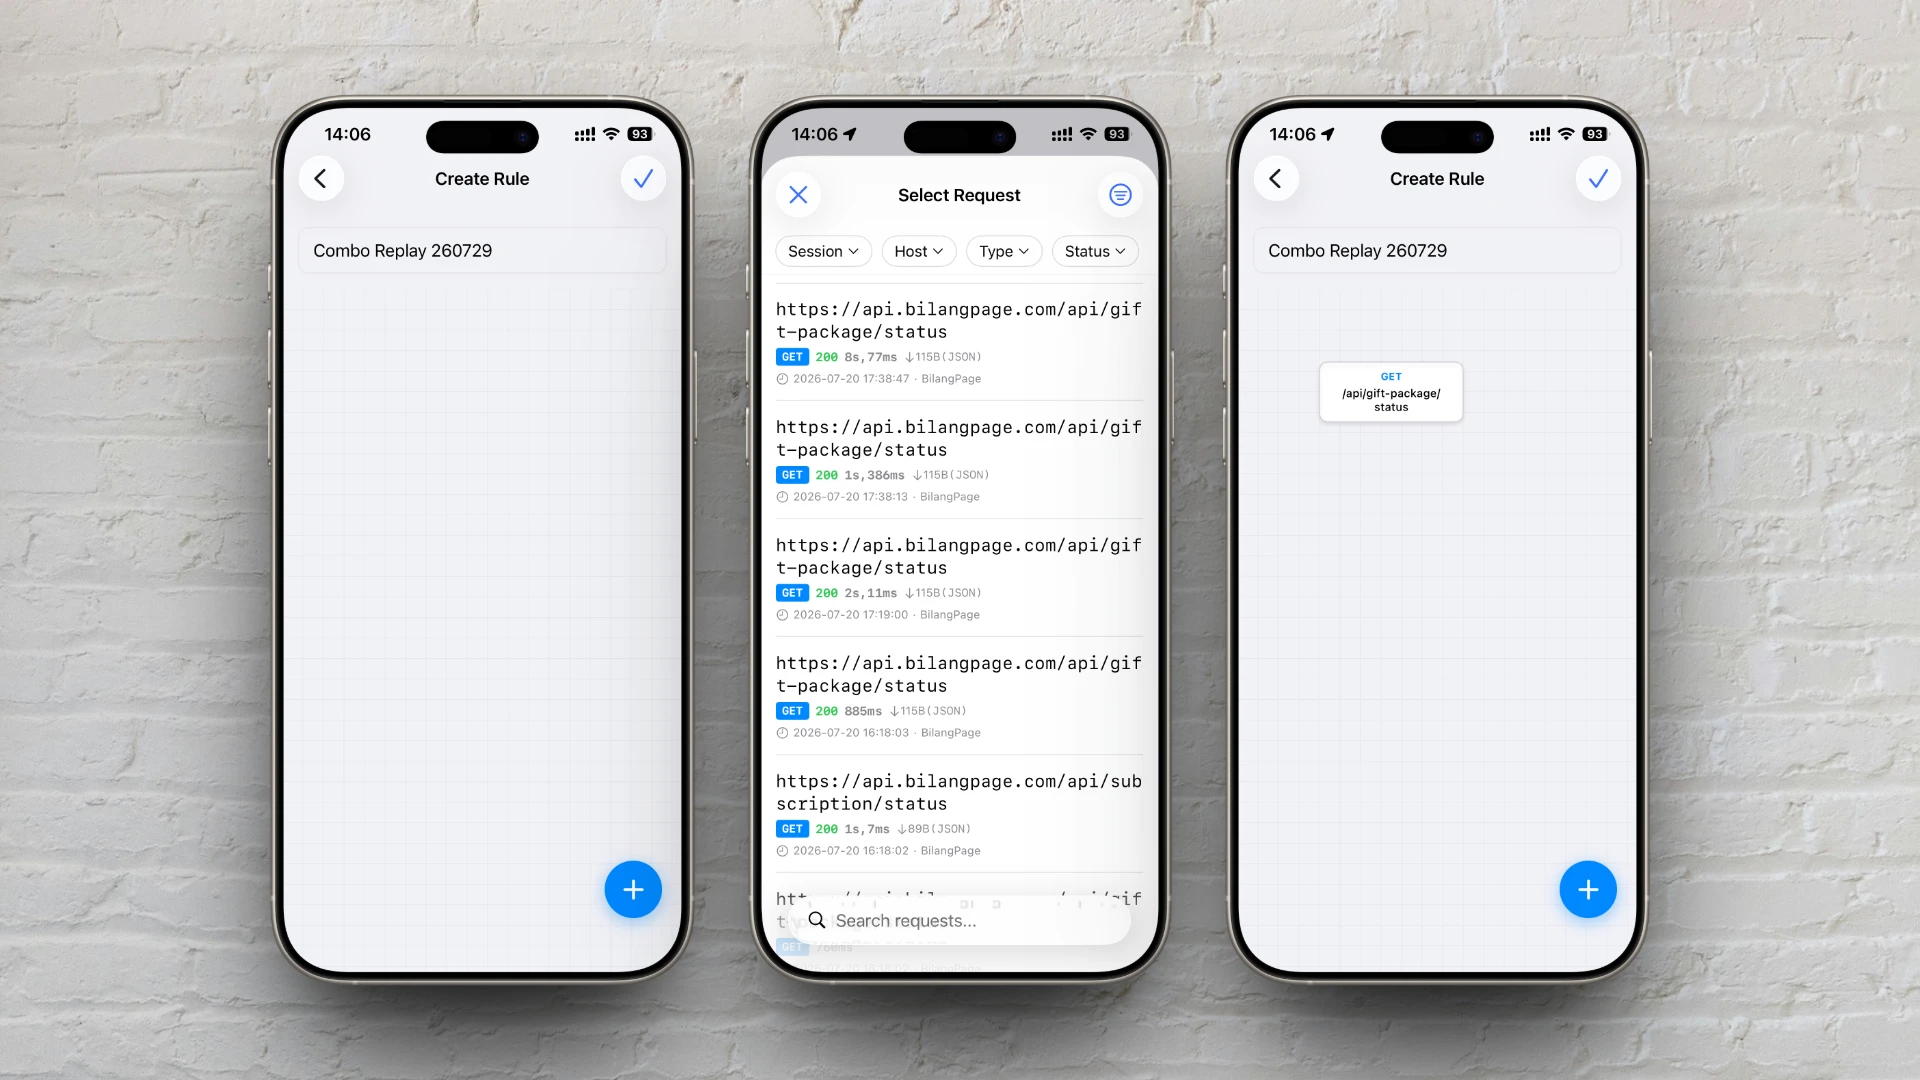
Step 2: Create a rule
- Open the Combo Replay list
- Tap + to add a combo replay rule
- Enter a rule name (required; default like
Combo Replay 260729) - Tap + at the bottom-right to add requests to the canvas
- Select the requests you need from the list
Step 3: Execute
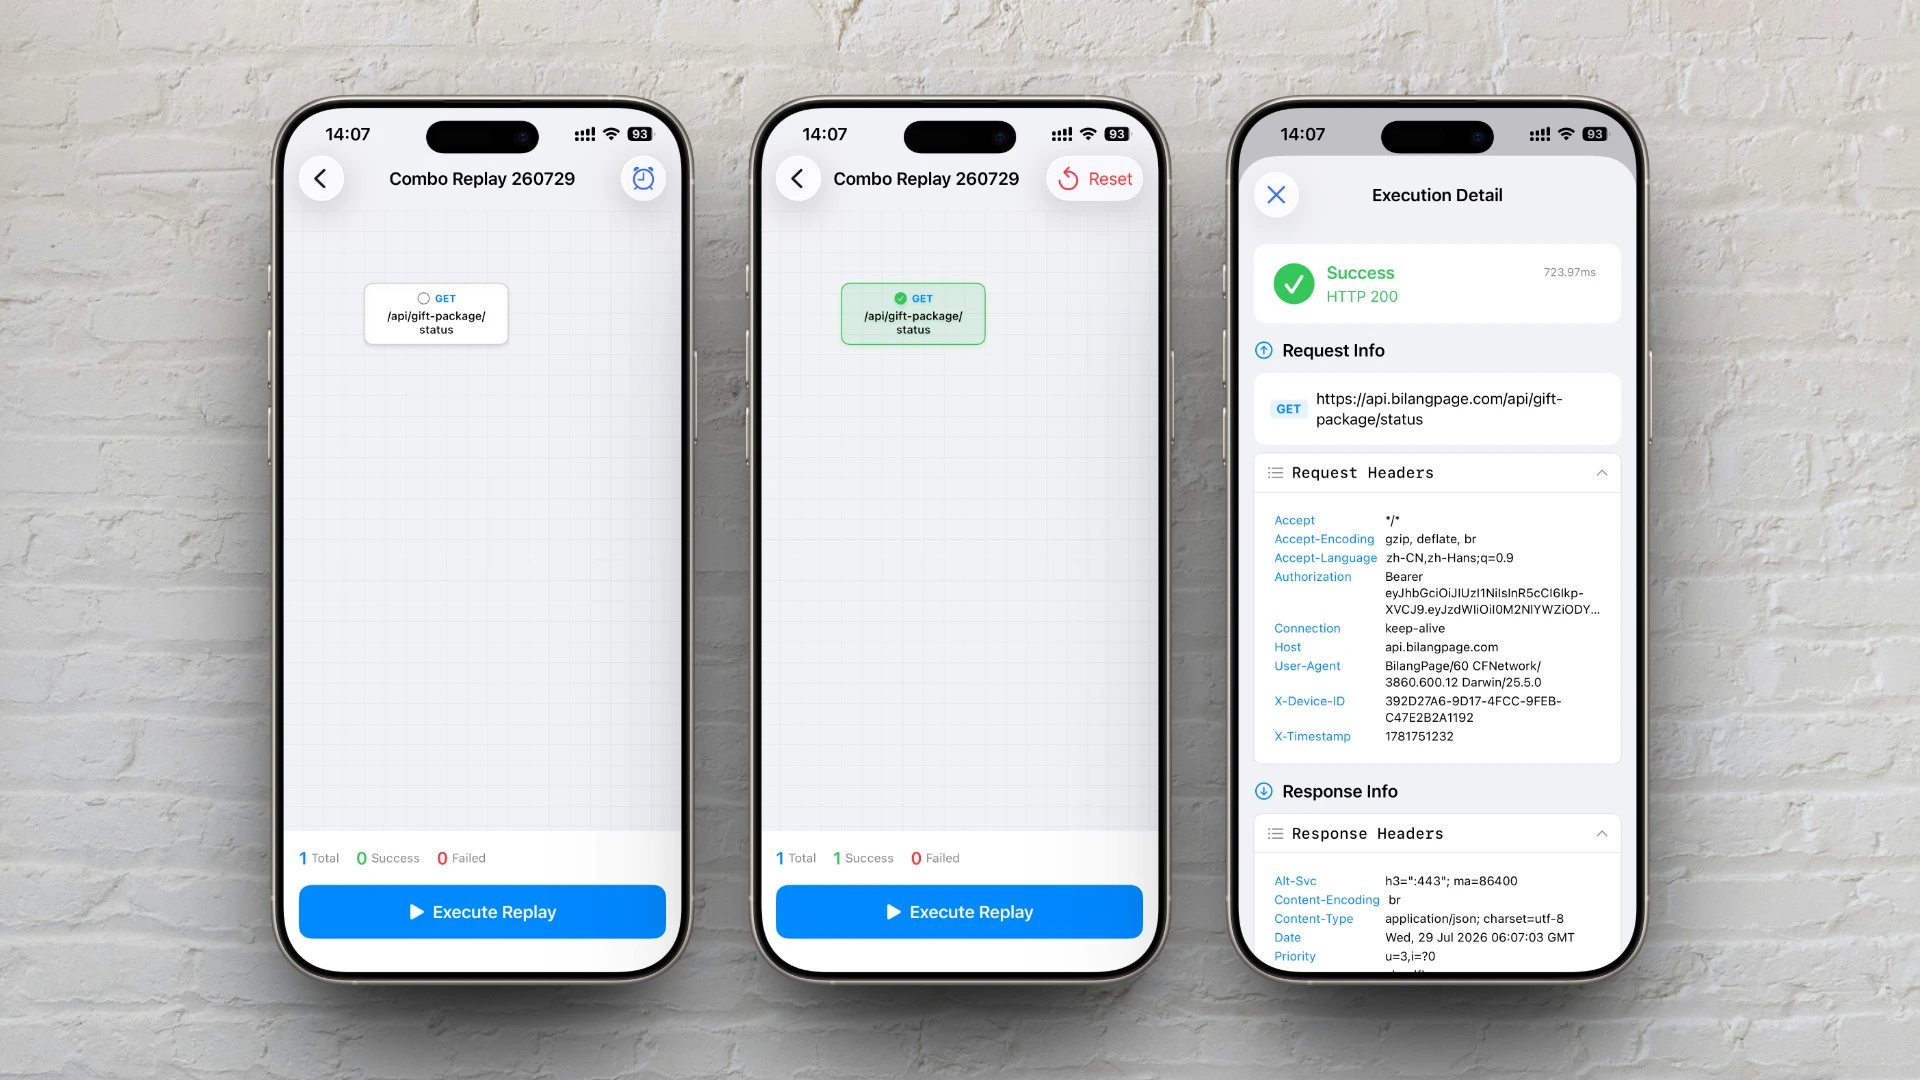
- Save the rule (✓ in the top-right of the editor)
- Tap the rule name in the list to open the execution page
- Tap Execute Replay
After execution, nodes show success/failure status; tap a node to view details.
3. Rule Management
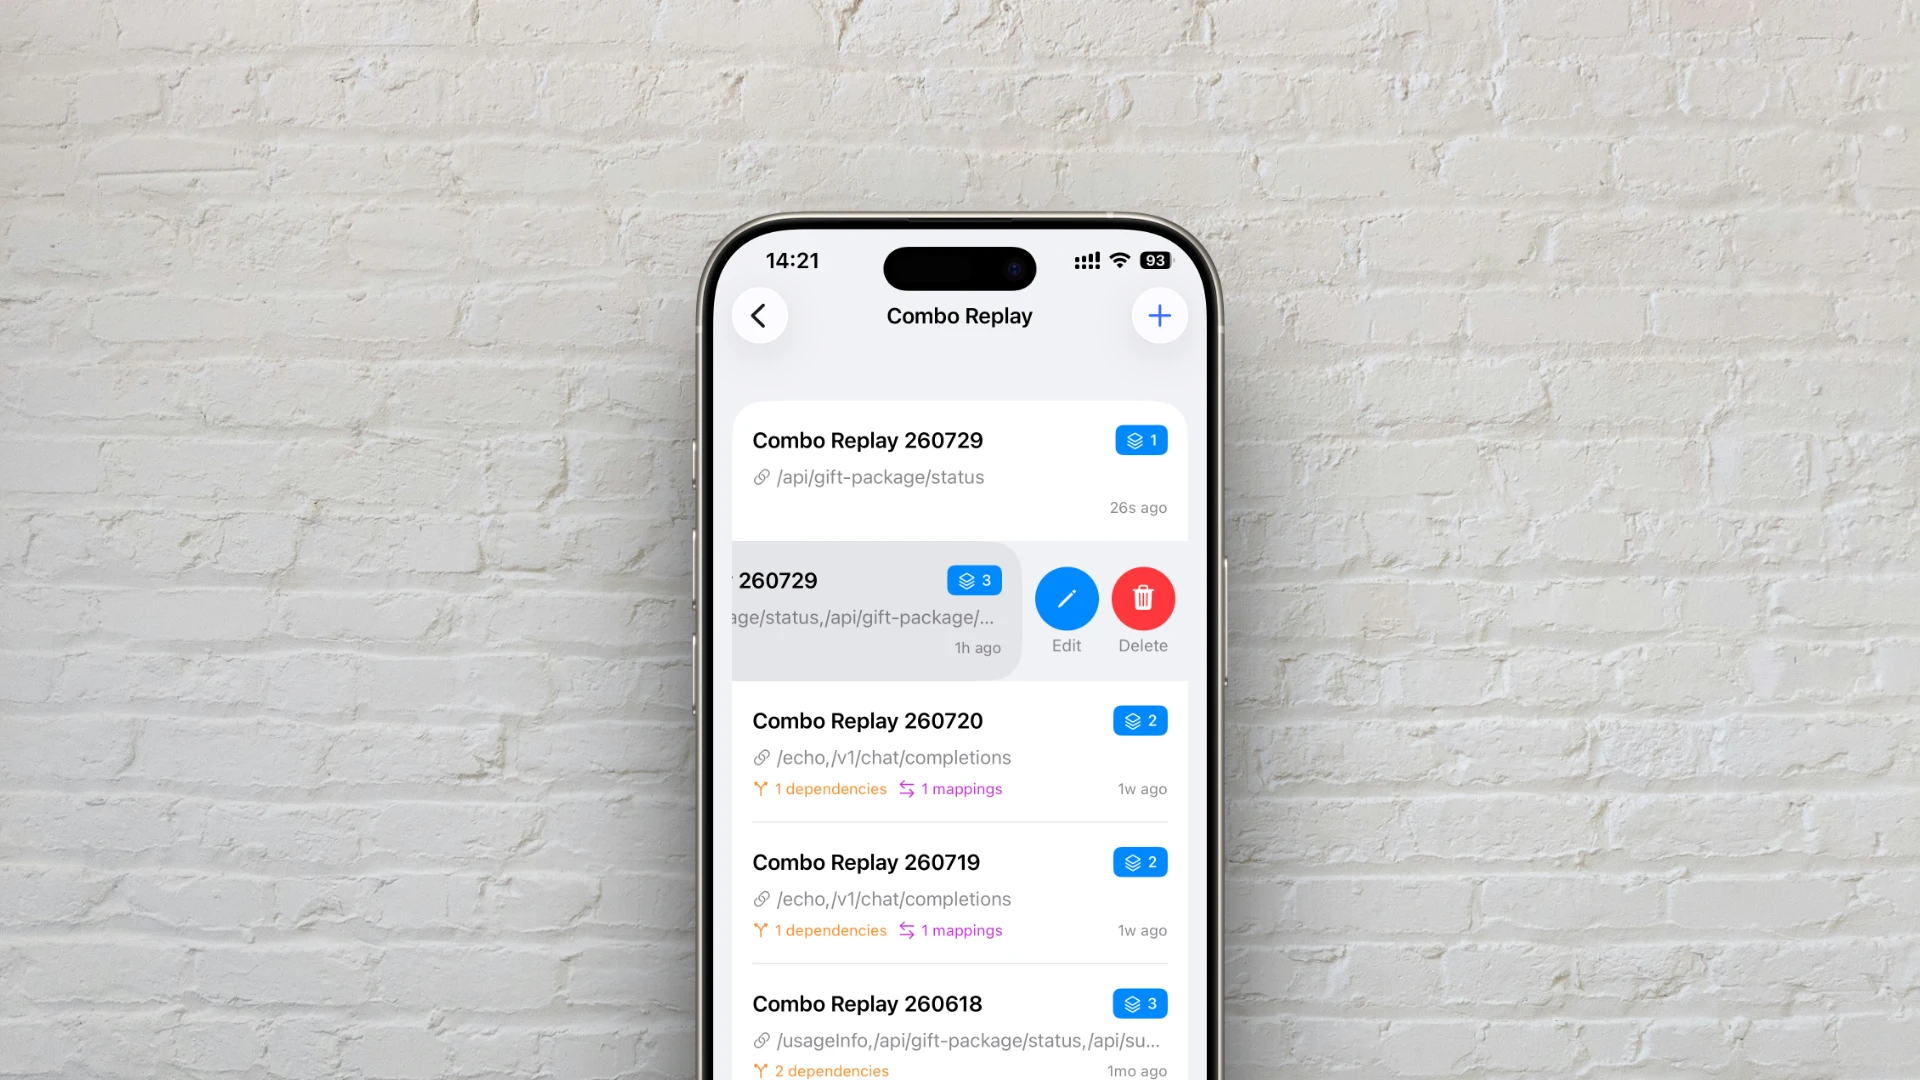
3.1 List information
Each rule card shows:
- Rule name
- Node count
- Path preview (up to 3)
- Dependency count and parameter mapping count
- Last updated time
3.2 Create / Edit / Delete
| Action | How |
|---|---|
| Create | + in the list navigation bar |
| Edit | Swipe left → Edit |
| Delete | Swipe left → Delete |
| Save | ✓ in the top-right of the editor |
Rules are stored locally and will be lost if you uninstall the app or clear data.
4. Editing Combo Rules
4.1 Adding requests
- Tap the + floating button at the bottom-right
- Search by URL / Method
- Filter by Session, Host, type, status code
The same API can be added multiple times: e.g., add 3 /api/order nodes to test normal orders, edge cases, and invalid parameters.
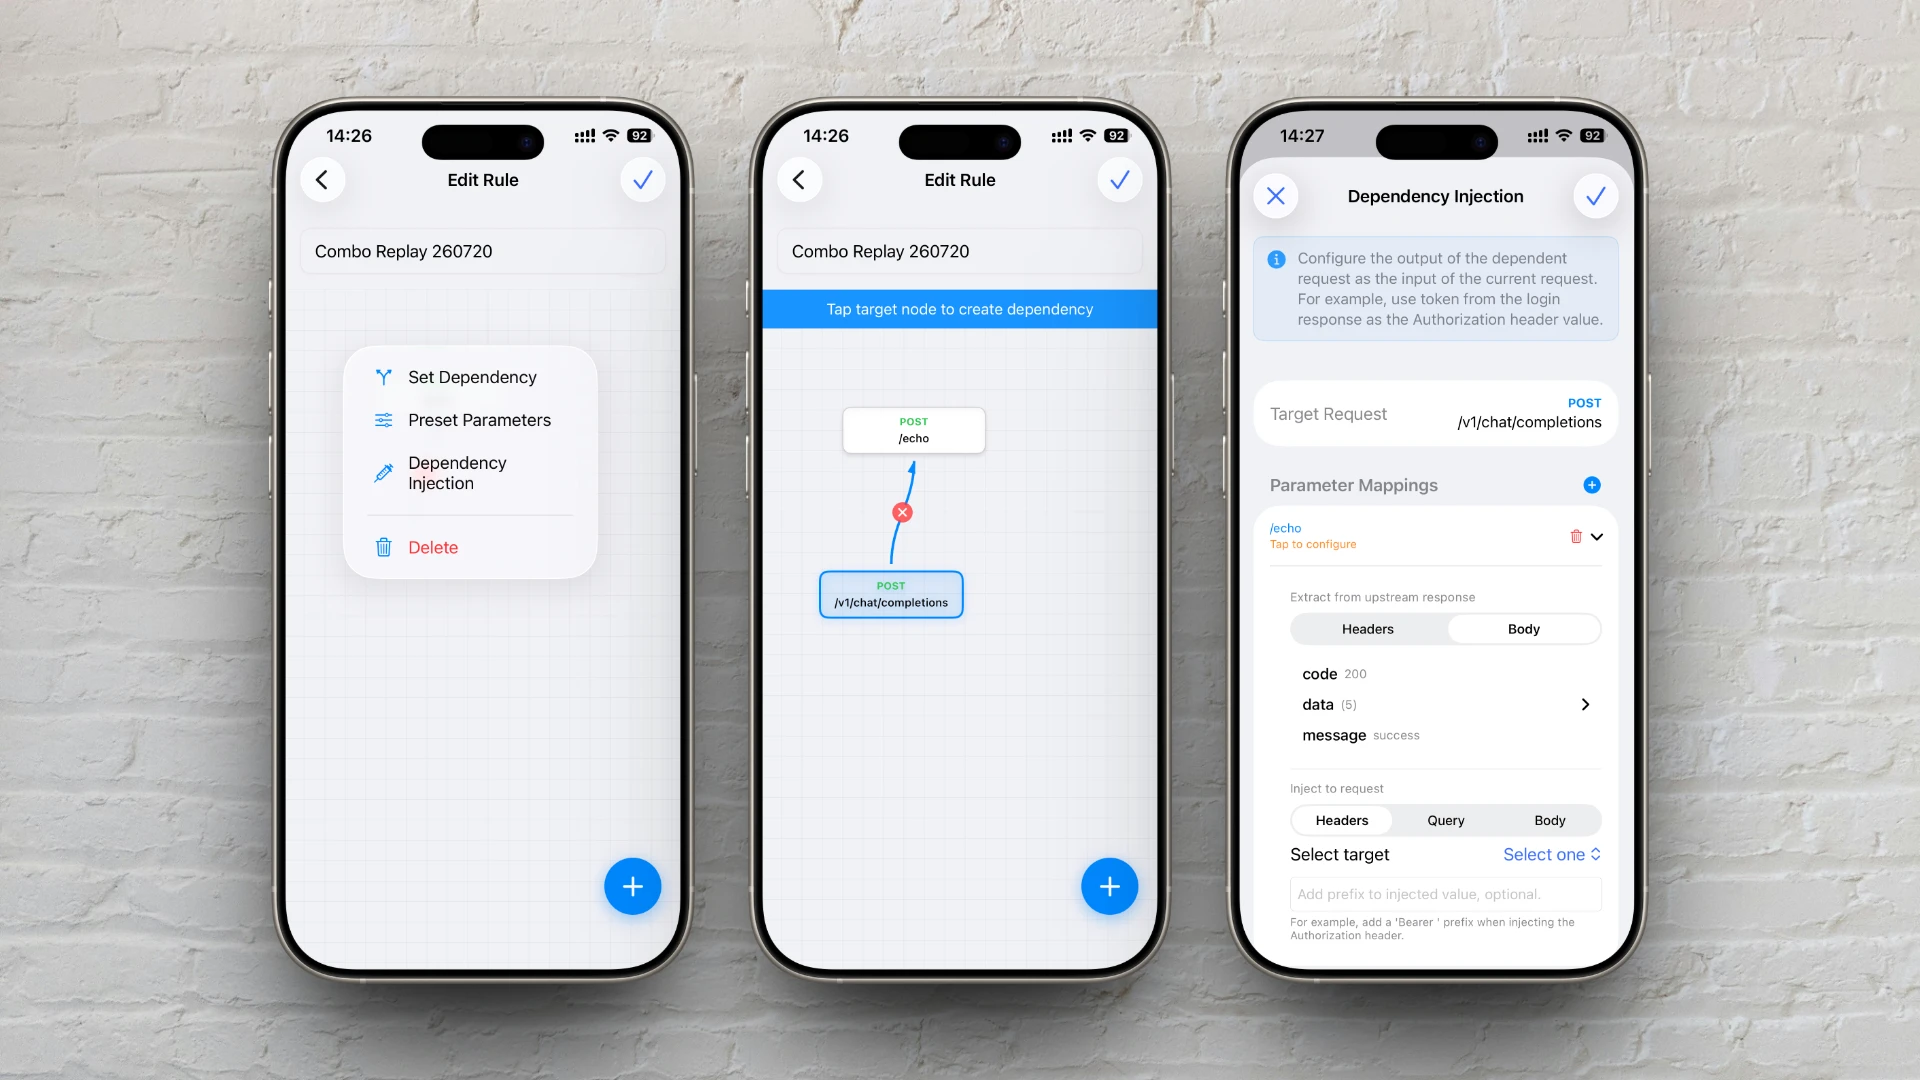
4.2 Node menu
Tap a node to open the menu:
| Menu item | Purpose |
|---|---|
| Set dependency | Enter link mode, then tap the target node to create a dependency |
| Preset parameters | Edit Query / Header / Body (you can also modify on the execution page, but changes there are temporary) |
| Dependency injection | Map upstream responses to downstream request fields |
| Delete | Remove the node and related dependencies/mappings |
Drag nodes to reposition; tap empty space to deselect or exit link mode.
5. Preset Parameters
Use these during rule editing to fix test data per node—especially for “same API, different inputs” scenarios.
5.1 Steps
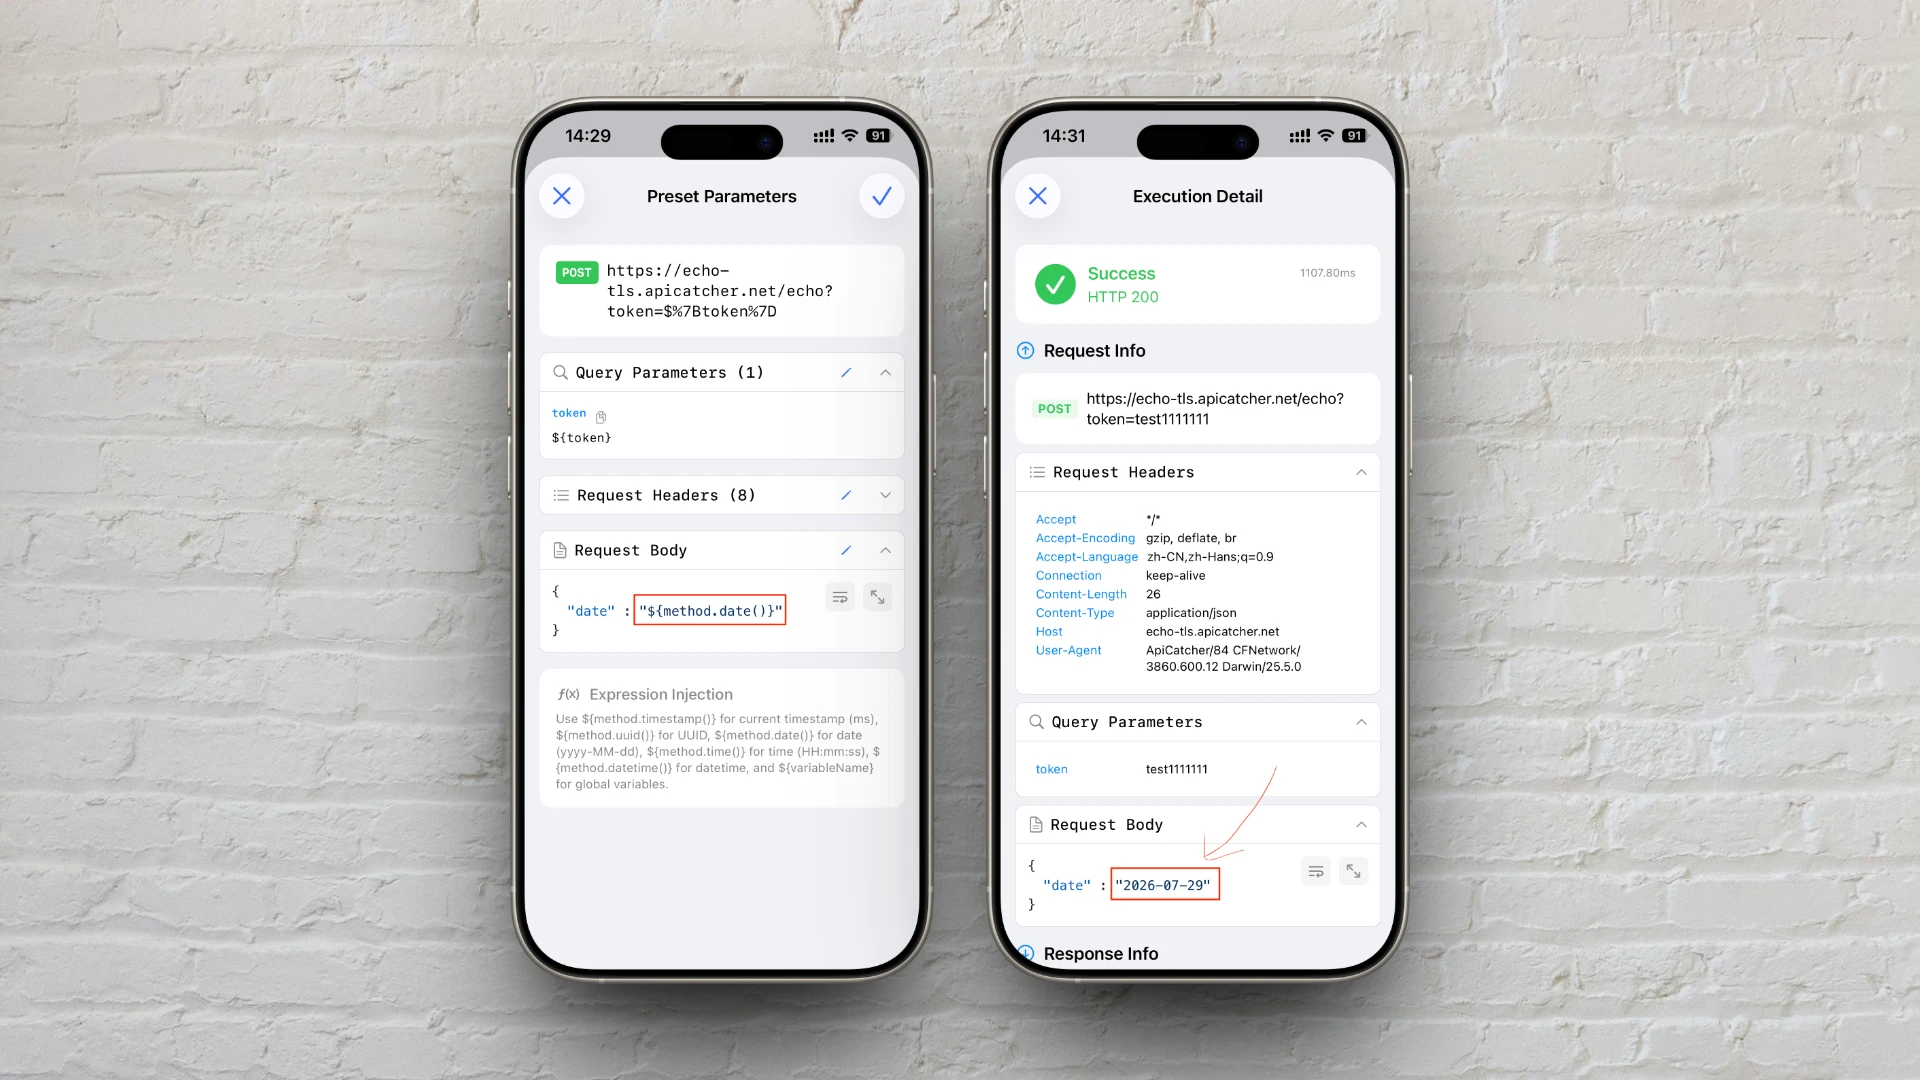
- Tap node → Preset parameters
- Edit Query / Headers / Body
- When done, tap ✓ in the top-right of the preset sheet to save to the rule
5.2 vs. “Modify request” on the execution page
| Preset parameters (editor) | Modify request (execution page) | |
|---|---|---|
| Entry | Node menu → Preset parameters | Tap node on execution page |
| Persistence | Saved in rule, persists next time | This run only, not written back |
| Use case | Fixed test cases | Temporary tweaks before rerun |
5.3 Example: same API, multiple scenarios
Node A: POST /api/login     → body: valid credentials
Node B: POST /api/login     → body: wrong password
Node C: POST /api/login     → body: empty password
(no dependencies → parallel execution)
5.4 Expression injection support
See: Section 8, Expression Injection
6. Dependencies
6.1 Meaning
A line A → B means: A depends on B; B runs first, A runs after.
The arrow goes from downstream (A) to upstream (B).
6.2 Creating a dependency
- Tap downstream node → Set dependency
- A blue hint appears: “Tap target node to create dependency”
- Tap the upstream node
- A line appears
6.3 Limits
- Cannot create duplicate dependencies
- Cannot form cycles
- Deleting a line also removes related parameter mappings
6.4 Execution order
        ┌─ Node B ─┐
Node A ─┤          ├─ Parallel (same layer)
        └─ Node C ─┘
              ↓
           Node D (runs after A and C succeed)
- Same layer (no mutual dependencies): parallel execution
- Different layers (dependencies): serial execution; next layer runs only after the previous layer fully succeeds
- Any failure in a layer: all subsequent nodes are marked skipped
7. Dependency Injection (Parameter Mapping)
Pass values from upstream responses (token, userId, etc.) into downstream requests automatically.
7.1 Prerequisite
The target node must have at least one upstream dependency, otherwise you’ll see “No upstream nodes; create dependencies first”.
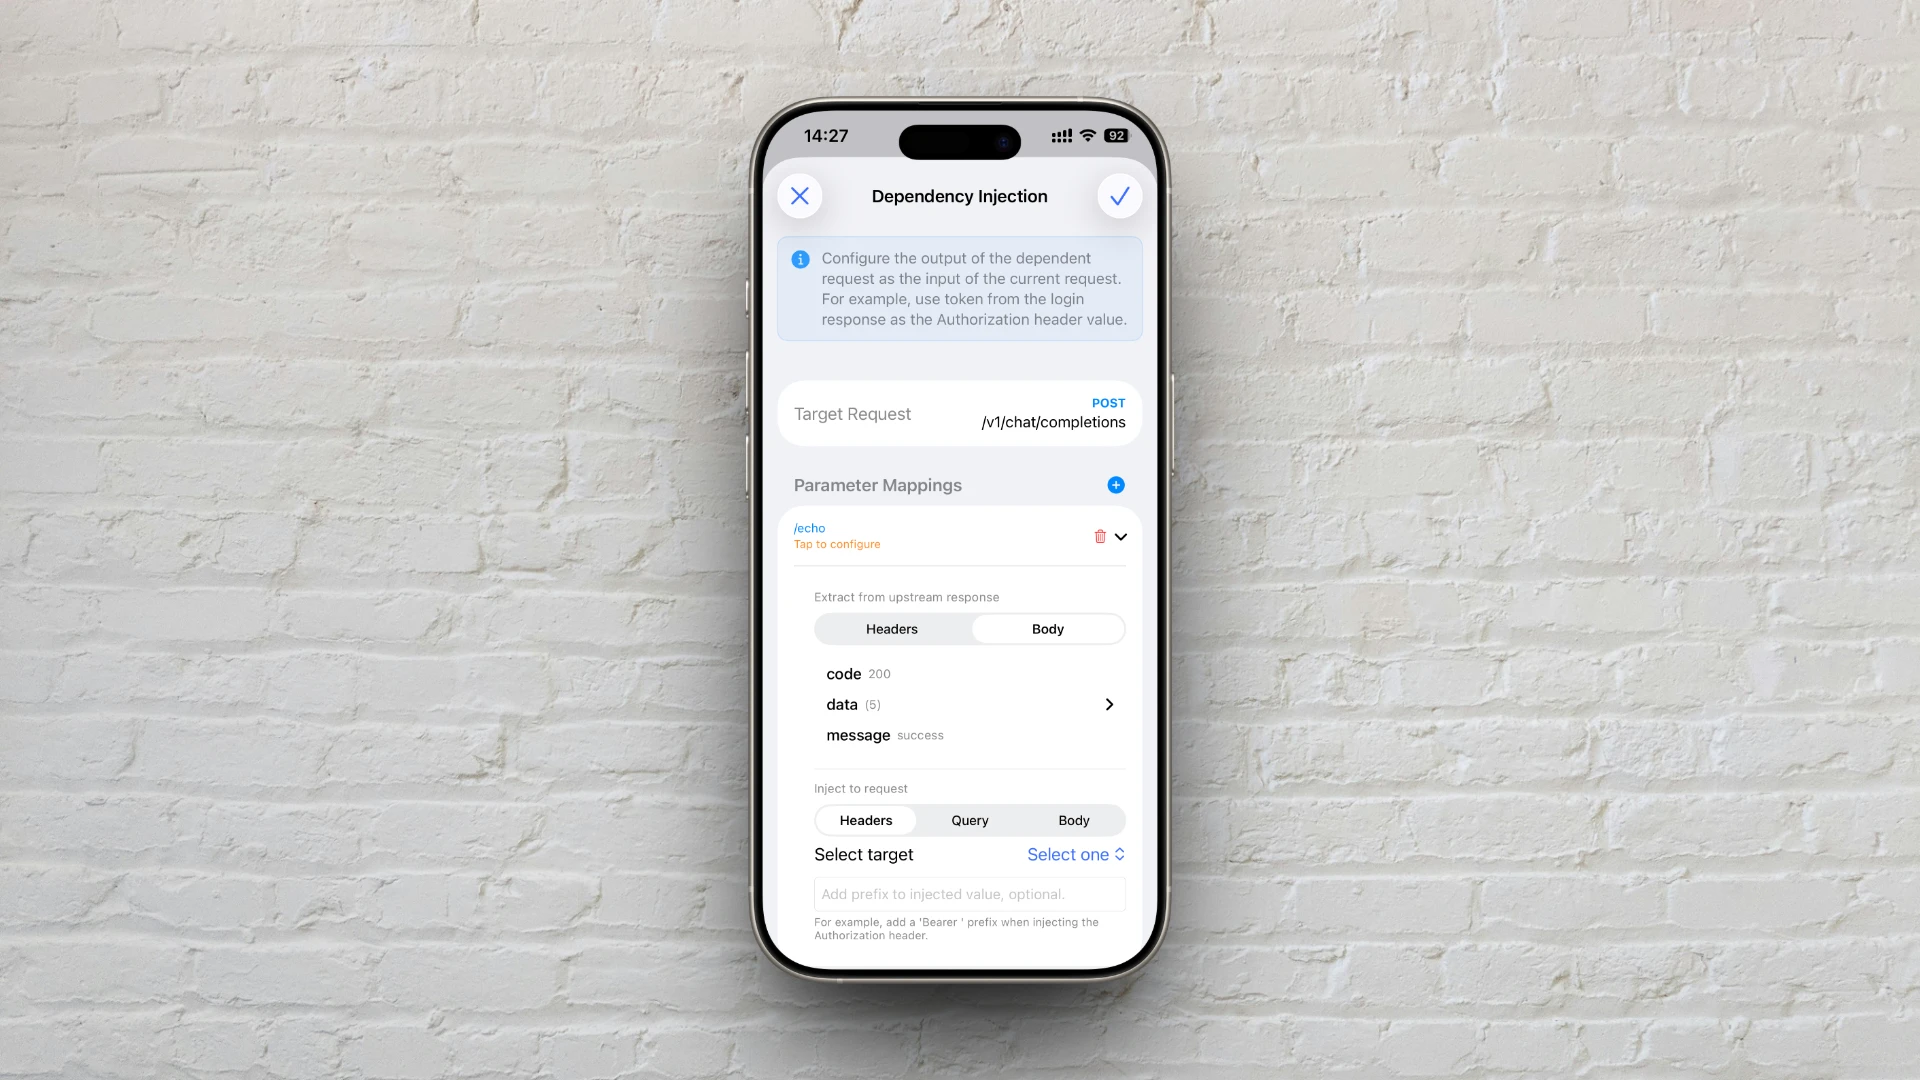
7.2 Configuration
- Tap downstream node → Dependency injection
- Tap Add mapping and configure:
| Field | Description | Example |
|---|---|---|
| Source node | Which upstream response to use | Login node |
| Extract from upstream | Response header / JSON path in body | data.token |
| Inject into request | Header / query / body | Header Authorization |
| Optional prefix | String prepended to injected value | Bearer |
- Save the mapping
7.3 Classic scenario: login + authenticated request
[Login POST /login] ──→ [Get profile GET /user/profile]
         │                        ↑
    response: data.token   Authorization = Bearer ${injected token}
- Add both requests
- On
GET /user/profile→ Set dependency → tapPOST /login - On
GET /user/profile→ Dependency injection:- Source: login node, body path
data.token - Target: header
Authorization - Prefix:
Bearer
- Source: login node, body path
7.4 Processing order at execution time
Preset parameters / modify request
        ↓
   Expression injection (${method.timestamp()}, etc.)
        ↓
   Dependency injection (parameter mappings)
        ↓
     Send HTTP request
8. Expression Injection
Write ${...} expressions in headers, query parameters, or body; they are replaced at execution time.
8.1 Built-in methods
| Expression | Result |
|---|---|
${method.timestamp()} | Current timestamp (milliseconds) |
${method.uuid()} | UUID (lowercase) |
${method.date()} | Date, e.g. 2026-07-29 |
${method.time()} | Time, e.g. 14:30:00 |
${method.datetime()} | Date-time, e.g. 2026-07-29 14:30:00 |
Example:
{
  "requestId": "${method.uuid()}",
  "timestamp": "${method.timestamp()}",
  "date": "${method.date()}"
}
8.2 Global variables
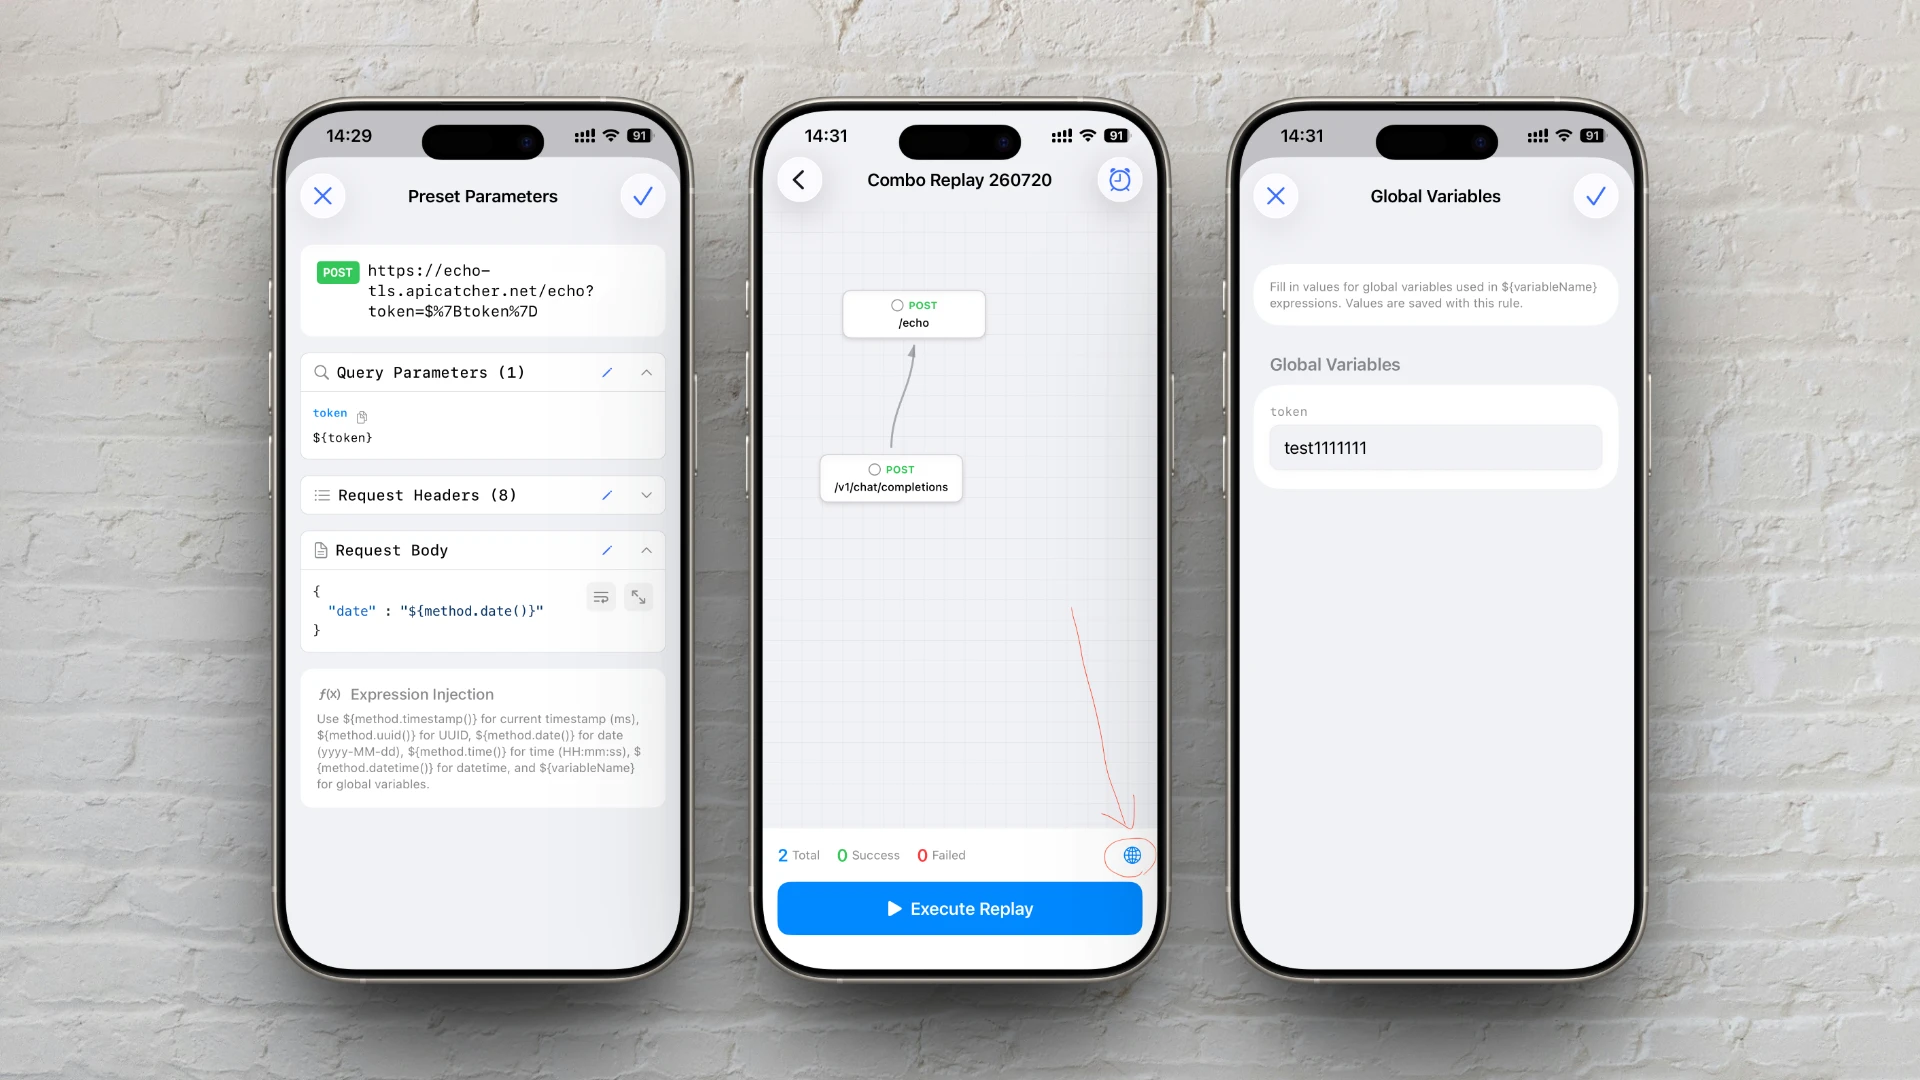
Expressions like ${token}, ${appId} (not starting with method.) are global variables.
Configuration (execution page):
- Any node in the rule uses a
${variableName}expression - A 🌐 button appears on the right of the execution page status bar
- Tap it and fill in variable values
- Values are persisted with the rule (cleared when the rule is deleted)
Preset parameters and execution-page “Modify request” both support expressions; replacement happens when you tap “Execute Replay”.
8.3 Combined example
Header:  X-Request-Id: ${method.uuid()}
Query:   ts=${method.timestamp()}
Body:    {"token": "${token}", "userId": "123"}
Fill in token via 🌐 before executing.
9. Execution Page
9.1 Layout
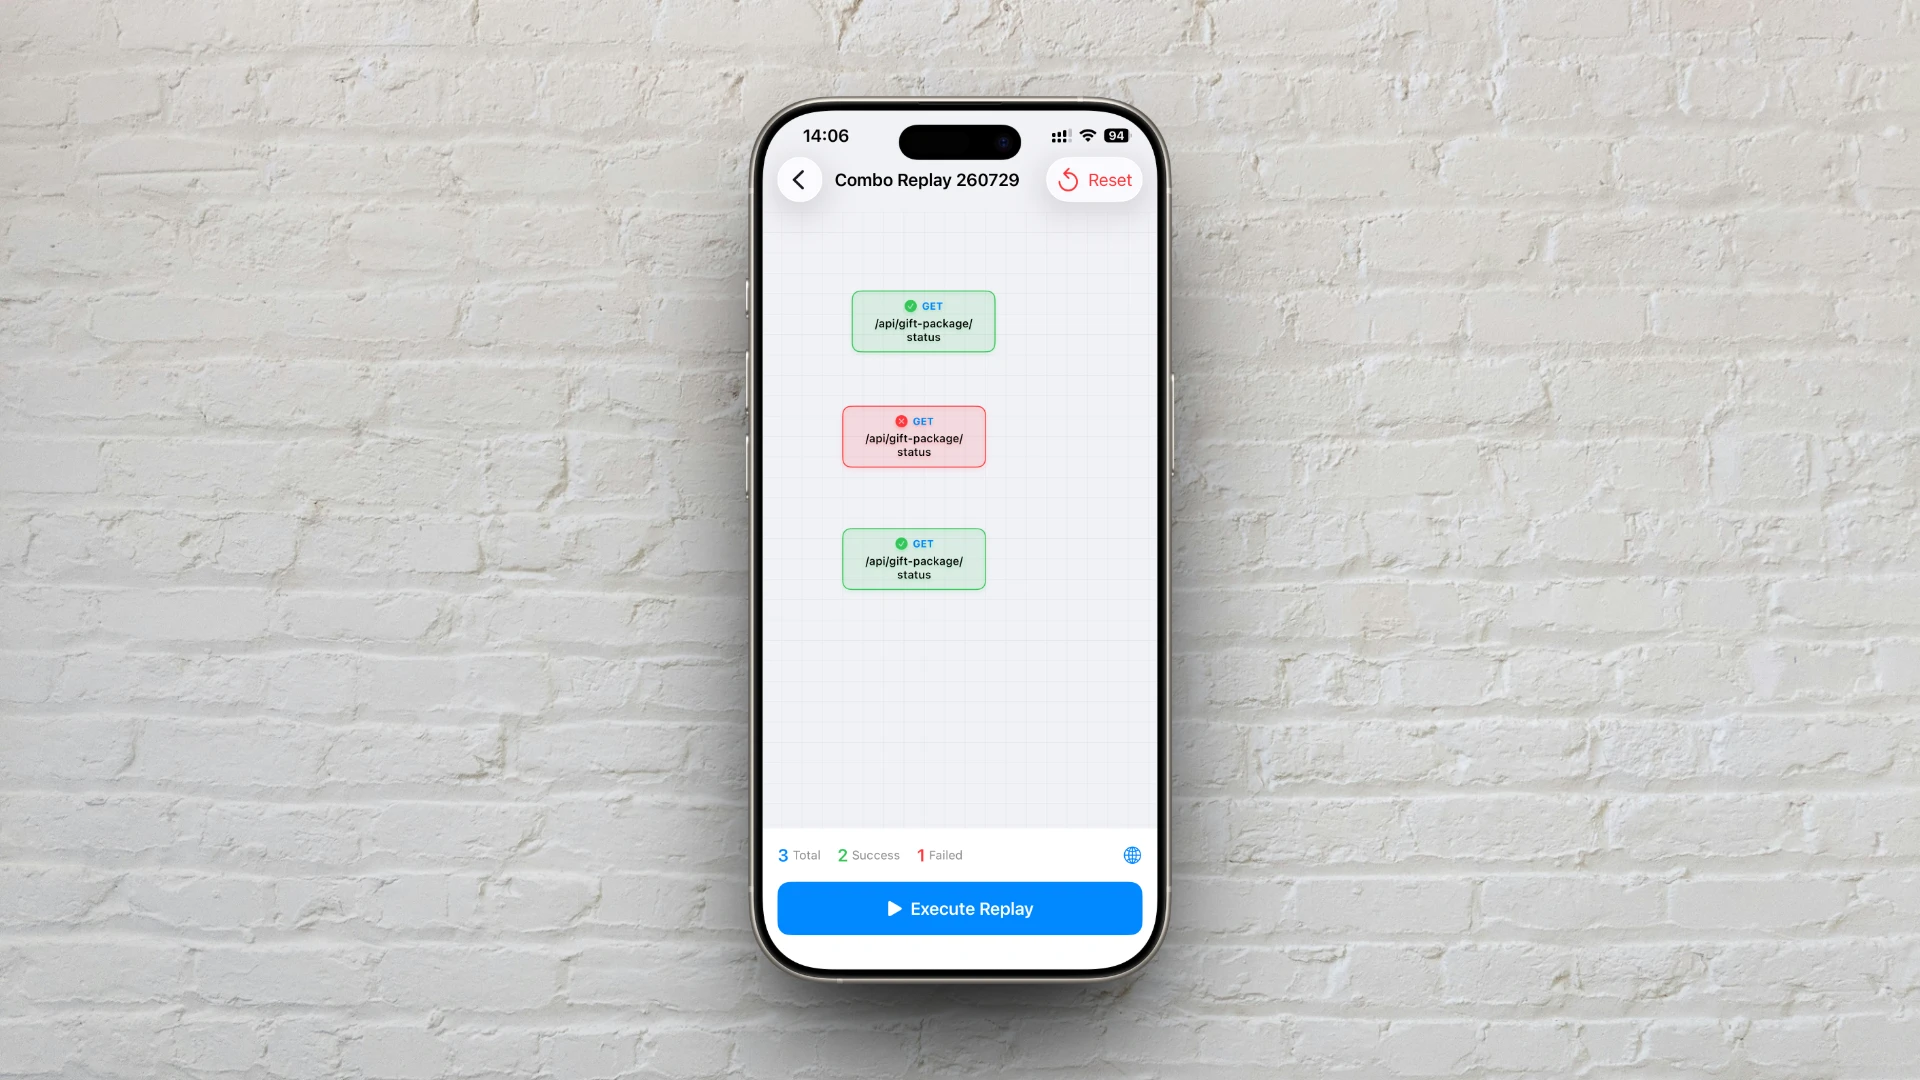
9.2 Before execution
- Tap node → Modify request (this run only, not saved to rule)
- If global variable expressions exist → tap 🌐 to set values
9.3 After execution
- Tap node → Execution details (actual request, response, duration, errors)
- Nav bar Reset (red): clear results and run again
9.4 Node status
| Status | Meaning |
|---|---|
| Gray circle | Pending |
| Blue progress | Running |
| Green ✓ | Success (HTTP 2xx) |
| Red ✗ | Failed |
| Orange − | Skipped (upstream failed) |
9.5 Success criteria
HTTP status codes 200–299 count as success; others count as failure.
10. Scenario Playbook
Scenario 1: Parallel tests with different inputs for one API
POST /api/order  node1  body: {"type":"normal"}
POST /api/order  node2  body: {"type":"edge"}
POST /api/order  node3  body: {"type":"invalid"}
- No dependencies → three nodes run in parallel
- Set different bodies via Preset parameters per node
- Compare results after execution
Scenario 2: Login chain
POST /login  →  GET /user  →  POST /order
     │              ↑              ↑
     └──── token injected into Authorization ─┘
- Dependencies:
GET /userdepends onPOST /login;POST /orderdepends onGET /user - Configure token mappings on
GET /userandPOST /order - Serial flow: login → get user info → place order
Scenario 3: Dynamic params + fixed token
- Body:
{"ts":"${method.timestamp()}","id":"${method.uuid()}"} - Header:
Authorization: Bearer ${token} - Set
tokenin 🌐 before execution - Timestamp and UUID refresh on each run
11. FAQ
Q: I added requests but the execution page is empty?
A: Save the rule with ✓ on the editor, then open the execution page from the list.
Q: I changed preset parameters but the execution page didn’t update?
A: Confirm the rule was saved on the editor; “Modify request” on the execution page only affects the current run.
Q: Dependency injection doesn’t work?
A: Check: ① dependencies exist; ② JSON path matches the sample response; ③ upstream node succeeded; ④ expression injection runs before dependency injection.
Q: Global variables replace to empty?
A: Set values via 🌐 on the execution page and save; unset variables become empty strings.
Q: Why are some nodes skipped?
A: When a node in the same layer or upstream fails, all nodes in later layers are marked skipped.
Q: Can I add WebSocket requests?
A: No—only standard HTTP/HTTPS requests are supported.
12. Quick Reference
| I want to… | Do this |
|---|---|
| Create a rule | List + → name → add requests → ✓ |
| Test same API with multiple inputs | Add the same request multiple times → Preset parameters per node |
| Control order | Set dependency → tap upstream node |
| Auto-fill token | Dependency injection mapping |
| Dynamic timestamp/UUID | Use ${method.timestamp()}, etc. in parameters |
| Shared token/config | Write ${token} → fill via 🌐 on execution page |
| Tweak params for one run | Execution page → node → Modify request |
| View request details | Tap node after execution |
| Run again | Reset → Execute Replay |